Create a handprint fly!

Ever try catching a fly? Well here’s a Handprint Fly created by the FreeKidsCrafts Team that will hang around and make you smile. Kids love pointing out projects they have made using their hands.
Supplies
Two Laminating Sheets or Contact Paper
Yarn or String
Black Pipe Cleaner
Scissors
Glue
Pen
Instructions
Peel the backing off the laminating sheet and place it sticky side up.
Squiggle yarn around sticky sheet to make the lines in the fly’s wings.
Peel the backing off another piece of laminating sheet and lay it sticky side down over the first sheet, sandwiching the yarn in between the two pieces.
Fold in half and trace around your hand on it. Cut out, cutting through all the layers so you will have two hands.
Print fly body.
Glue on handprints to make wings.
Cut pipe cleaner into four pieces. Glue to the back of the fly body. Bend ends.
Patterns, Templates and Printables
Click on the printer icon to print it out

Create a spider pin!

Let your Halloween spirit show when you put this Spider Pin on your outfit or backpack for all to see The kids will love to hear the giggles as their friends spot their Spiddy pet.
Supplies
Pom Pom Maker
Black yarn
Scissors
2 small black pom poms
Tacky glue
Scrap of Black Felt
Jewellery Pin
Instructions
To make the Spider Body follow the directions on the Pom Pom maker or make your own medium pom pom.
For the Legs cut 8 lengths of pipe cleaner, each about 3 1/2 in. (9 cm) long.
Bend one pipe cleaner close to one end, then again about 1 in. (2.5 cm) above first bend. Repeat with remaining pipe cleaners.
Apply a small amount of glue to unbent end of one pipe cleaner. Insert glued end into Spider Body, adjusting leg so that it bends away from the Spider Body. In this same way, insert 4 pipe cleaner legs into each side of Spider Body.
Then glue on 2 small pom poms for eyes.
Cut a 1 in. (2.5 cm) diameter circle from felt. Glue to underside of Spider. Allow to dry, then glue pin back to felt.
Create button birds!

Make these Button Birds from buttons that you find in grandma’s or Mom’s sewing box. They do still have those don’t they or am I dating myself. You can start with the ones supplied here and then create some of your own. They will make great cards or embellishments for notes. People still do write notes…please say yes.
Supplies
Buttons
Scrapbook paper
Glue
Thin black sharpie/pen
Instructions
Start by gluing buttons to a piece of card stock paper.
Then add some eyes, legs, feathers, etc with the sharpie!
Cut out little beaks and wings from scrapbook paper, then glue them to the buttons.
These make adorable little cards…add some music notes between them like they’re chirping!
Create a paper bag cat!

Paper Bag Cat Craft
You can make a grey cat like the one in the picture or use different colors for an orange, brown, tan or black cat.
Puppets are fun tools for teaching; children are always happy to engage with an activity when invited by a cheerful little puppet. It is amazing how a smiling kitty cat can encourage even very shy children to take part in circle time.
Materials:
- a paper lunch bag
- two sheets of construction paper or paint in the color you’re making your kitty,
- a printer,
- some crayons,
- scissors,
- glue,
- paper for the printer
Optional:
Print the Template:
- You can either print just template one or both templates.
- The more children you have per adult and the younger the children are, the simpler (less templates) you want the craft to be.
- If you aren’t sure how many templates you should use, print both, but hide #2. If the kids make it through #1 and are eager for more, bring out the other. If they are tired of crafting, save them for another day or just discard them.
- Color (as required) and cut out the template pieces.
Get Familiar with Your Paper Bag:
- I’m going to walk through this slowly. Look at your paper bag.
- It should be closed and flat like a piece of paper. Just like when they are brand new.
- On one side, it’s all smooth. This will be the BACK of your puppet
- It’s important that all the kids get the back and front straight at the beginning!
- On the other side there’s a flippy tab (which is typically the bottom of the bag when you’re carrying your lunch around…)
- This flippy tab will be the HEAD.
- Lift the flippy tab up a bit. Underneath of the tab will be the mouth,
- When the child puts her hand in the bag, she’ll be able to make the puppet talk.
- Look at the rest of the front of the bag. (The 3/4 or so of the bag below the part with the flippy tab.) This will be the BODY.
- Look at the sides of the bag. There should be a FLAP of paper.
- We’ll be slipping the arms (template 2) into this flap.
- If the kids goof and glue the arms onto the front or back of the bag, it isn’t a big deal.
- OK, now that we’re comfy with our bags, let’s craft!
Template #1
- Cover the paper bag with construction paper (just glue it on and trim) or paint the paper bag and let dry.
- Glue the muzzle onto the HEAD. It should overlap the body a bit.
- Glue the nose onto the HEAD. It should overlap the muzzle a bit.
- Glue the eyes onto the HEAD above the nose. If you like, you can use wiggly eyes
 instead of the paper template pieces.
- Glue the ears onto the sides of the HEAD.
- Glue the tongue underneath the flippy tab so you can see part of the circle sticking out from under the muzzle.
- Glue three whiskers (long, thin rectangle pieces) onto either side of the muzzle.
- Glue the tummy onto the body.
Template #2
- Glue the arms into the FLAP.
- Glue the tail onto the BACK.
Templates:
- Close the template window after printing to return to this screen.
- Set page margins to zero if you have trouble fitting the template on one page (FILE, PAGE SETUP or FILE, PRINTER SETUP in most browsers).
Create toilet-paper-roll dogs!
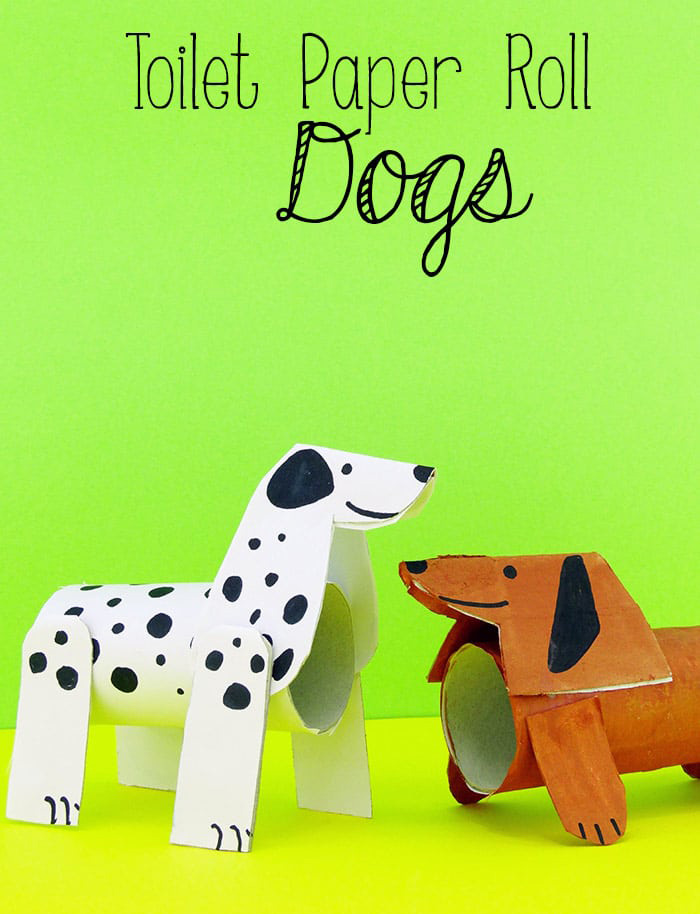
Crafts with toilet paper rolls are always great as it’s one of the most frugal crafts in the world!
There are no limits to breeds you can make and we decided to make a Dalmatian and Daschund as those two are, in my opinion, one of the cutest to make (personally I’m in love with muts though! – and there isn’t a dog more awesome than a shelter dog ;))
You can make a whole pack of dogs really, the more the merrier, and this can be used to teach kids about all the different breeds of dogs.
What you’ll need:
- a bunch of toilet paper rolls or rolls from kitchen towels – if for whatever reasons you find those two unappealing you can now actually buy paper rolls for crafting with kids.
- empty cereal box or any other box with thin and easy to cut paper
- scissors
- colours and brush (or markers or both)
- white or coloured paper (optional) and white school glue
We started by covering our toilet paper rolls with white paper (seemed easier to color them that way) – we glued them on with white school glue.
You can draw the black dots for the Dalmatian with black marker (just a hint – this would work really great for a cow too).

Draw the head shape and legs (you can naturally do the tail too on the cereal box and cut it out. Glue on white paper or colour white. Draw the facial details and paws.
Once everything dries glue on the legs and head.

Moving on to Daschund – We used two paper rolls for this one to make it’s body longer – pushing one paper roll into the other and gluing them together. We did everything pretty much the same but we made the legs shorter and coloured the dog brown.

Create a toilet roll goat!
Toilet Roll Goat

We’ve made a template for a simple goat Chinese paper cut – perfect for Year of the Goat!
You will need:
Toilet roll
Brown paint
Cream wool
Cream card
Black marker pen
Wiggle eyes
Instructions:
Squash the cardboard tube a little flatter. Using the photo below as a guide, use first a pencil and then a market pen to draw an outline for one side of the goat.

Cut the goat out, cutting through both sides of the tube – an adult will need to do this for younger children as it is a little tricky. Cut along the bottom of the legs to separate them.

Toilet roll goat cut out and ready for painting
Paint the tube brown.
When the paint is dry fold the head down and open out the body so your goat stands up.
Glue lengths of wool along the back of the goat.
Glue small strips of wool on to the chin, and stick on the wiggle eyes.
Cut two horns from cream card and glue on to the goat’s head.
Draw on a nose and mouth.

Toilet roll goat – so cute!

Side view of our toilet roll goat craft
Create a paper plate cow!

DLTK’s Crafts for Kids
Paper Plate Cow Craft
This adorable cow craft uses a printable template and a paper plate to make a project suitable for farms crafts, mammals, letter C theme or just for fun.
If you cut out holes instead of using the template eyes, you can convert your cow craft to a cow mask. Attach a paint stir stick or tongue depressor to allow your child to hold it up to their face.
Materials:
- brown paint and paintbrush
(or you can keep the face white if
you don’t feel like painting).
- paper plate,
- something to colour with (or colour printer),
- scissors,
- glue,
- paper,
- printer,
- Optional: You can substitute large wiggly eyes for the template eyes.
- Optional FOR MASK: Paint Stir Stick, thin strip of wood or Tongue Depressor.
Instructions:
- Paint the bottom of the paper plate brown (or you can leave it white if you prefer).
- Print out the craft template of choice.
- Colour (if using the black and white version of the craft) and cut out the template pieces. Most of the pieces are simple enough shapes for young children to cut out, but if needed, an adult can help with some of the harder pieces (the ears and the hair).
- Glue the pieces to the plate to make a cow face:
- Glue the ears onto either side of the head.
- Glue the horns onto the head just beside the ears.
- Glue the hair onto the center top of the head.
- Glue the eyes onto the face under the hair (or cut out holes for eyes in a mask).
- Glue the eyebrows above the eyes.
- Glue the snout under the eyes.
- Optional: If making a mask, use masking tape or duct tape to attach a thin strip of wood, a Tongue Depressor or a Paint Stir Stick (often free at paint supply and home repair stores – we get dad to pick one up now and then when he’s at home depot admiring the tools *grin*)

Print out a horse shaped maze!
Help the jockey and horse find their way through the horse shaped maze to find the next fence to jump.

Explore animal shadow puppets!


Explore kids nutrition!

Fuzzy felt fun from outer space!

How To Make Space-Themed DIY Fuzzy Felt
One of the simplest and most fun crafts we have tried this year: learn how to make a space-themed DIY fuzzy felt board set, with free printable templates.
I really wanted to make a DIY fuzzy felt board set for Pickle after he enjoyed playing with the ELC version at his child-minder’s house. At first I wasn’t sure if there was a magic formula to make the felt stick to the board, but after a bit of Googling, I realised that felt will stick to itself (and also to flannel), so it was pretty straightforward!

To make space-themed DIY fuzzy felt, you will need:
- a canvas or wooden frame (any size you like)
- a piece of black felt or flannel large enough to cover your frame or canvas, plus an extra 4cm overlap
- an upholstery stapler (and staples!)
- felt scraps in assorted colours
- dress-makers pins
- free printable template of space shapes
- embroidery thread in assorted colours (and a needle)

How to make space-themed DIY fuzzy felt:
- Cover your canvas or wooden frame with the black felt/flannel using your upholstery stapler (I found the tutorial from Brit & Co. helpful for this)
- Download the free printable template of space-themed shapes, pin these to your fabric scraps and cut them out carefully
- You can use embroidery thread to add details and features (for example I used back stitch for the alien’s mouth and a French knot for his pupils). I also used different colour felt pieces for the astronauts’ helmets and the UFO port-holes and sewed those on (however, you could leave them loose and allow them to be positioned too – I only stitched them together as my boys are so young, they tend to lose really small things!
Pickle was pleased with his DIY fuzzy felt set and spent a good while playing with it in the garden. He even cut his own removable ‘rocket boosters’ out of yellow felt and added them on. He did tell me the astronauts were too big: “Mummy, they can’t fit inside the rocket!”, so you may want to play around with scale if your kids are anything like mine!
Once you have made the DIY fuzzy felt base board, you can add all kinds of other felt designs (plants, animals, buildings, vehicles for example).
Enjoy your crafting and resulting imaginative play!


 There Was an Old Lady Who Swallowed A Fly.