Christmas crafts and festive activities for little hands
Don’t forget to tag us on social media if you share your Santa or Christmas fairy creations: we love to see them!
Dear Santa letter
Click to download and print this letter, then fill it in and bring it along when you come to see Santa in Love!

Fairy collage

Activity Village has a lovely webpage featuring a Christmassy fairy collage. It even provides a template, so grown ups’ drawing skills needn’t be put to the test (though there is something lovely and homemade about a wonky Christmas fairy!)
This festive craft can be made suitable for all ages: the youngest can colour or stick under supervision, slightly older children can use safety scissors to cut out as well as decorating, and older children could be challenged to create in the style of an artist, or let loose with watercolours!
You will need:
- card for face and hands, hair, and dress (or you could recycle wrapping paper, or pictures from a magazine, and stick it to card!)
- a sheet of plain card for the background, and another for the template
- fancy paper for the wings (baking paper or tracing paper would work fine, even a paper doily if you have one)
- glue stick
- pens
- glitter glue, stickers etc for decorating
- (optional) sticky tape if you want to make a finger puppet (instructions below)
Instructions

- Print the template below onto plain card and cut out each shape. Trace around them onto your chosen cards and papers, and cut the parts out for your collage. (The hands may be tricky for younger children to cut out!)
- Glue the hair to the front of the face, and draw in eyes (or use googly eye stickers!) and a smile. Decorate the dress with glitter glue and stickers or anything else you have to hand. Glue the hands to the end of the dress sleeves (you could use tweezers or clothes pegs to help little hands pick them up!)
- Glue the dress to the wings so the it is about in the middle, and then glue the head on top.

To make your fairy into a finger puppet
Cut a rectangle of card approximately 1″ x 2″. Tape one end to the back of the fairy. Tape the other end down close to the first so a loop is formed. Slide your finger into the loop (or pop it over a wooden spoon) and let your festive fairy dance and fly!
Christmas fairy
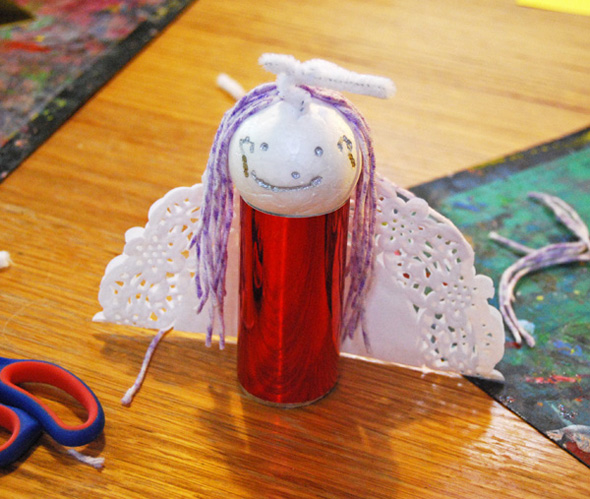
This lovely Christmas fairy craft and printable is by Ali Price of At Home with Ali. The original appeared on Childhood 101. You may want to supervise younger children when attaching the cocktail sticks – they can be quite sharp and it’s a tricky job!

You will need:
- loo roll inner/small cardboard tube
- coloured paper
- cocktail sticks
- styrofoam ball (50mm)
- permanent metallic marker
- wool for hair
- small paper doily
- sticky tape and white PVA craft glue
Instructions
Make the fairy’s body

Trim about 2cm off the end of the loo roll – this will make it easier to stick the fairy head to the body. Cover the loo roll with coloured paper (or try recycling old wrapping paper, or kitchen foil) and secure with sticky tape.
Make the fairy’s head

Skewer two cocktail sticks (approximately the width of the loo roll) into the styrofoam ball fairy head. Careful of little fingers! Push the ball, with cocktail sticks attached, into one open side of the loo roll body (the cocktail sticks should go inside the loo roll body). Secure the cocktail sticks to the inside of the body with sticky tape.

Draw on a fairy face with a permanent metallic marker (make sure the lid is back on the pen afterwards – they really are permanent!) Cut strands of wool for hair. Put a dollop of craft glue on top of the fairy’s head and secure the fairy’s flowing locks.
Make the fairy’s wings
 Fold a small paper doily in half to make the fairy wings. Tape the doily wings onto the back of the fairy.
You can add a pipe cleaner halo for an angelic touch, or make accessories like a wand from a paper star and a cocktail stick.
Santa paper ornament
Amy at The Idea Room shared how to make this fantastic Santa paper ornament! With his belly full of festive treats, he would look equally at home on a windowsill or mantelpiece. You will need:

- red, white, flesh coloured and gold paper or card – or pens for colouring in
- (optional) cotton wool for a fluffy beard and hat
- template (link below)
- scissors
- glue stick
- fillable plastic bauble – you can pick these up fairly cheaply at high street shops (adjust the Santa template to the size of your bauble)
- sweet treats to fill Santa’s tummy!
- craft knife (for adult helper use only)
- narrow ribbon (long enough to go around the bauble)
- sticky tape
- (optional) string or ribbon for hanging
Instructions (watch the Facebook video here)
- Print the template by clicking on the link: Santa Claus Paper Ornament Patterns. If you are going to colour in each piece, do it now, then cut out the pieces. You could even stick a little bit of cotton wool to Santa’s beard and moustache, and the trim and pom pom of his hat, to make them fluffy!
- If you are using coloured paper or card, trace the template onto each piece then cut them out.
- Glue Santa’s beard onto his head, followed by the Santa face and hat trim. (Take a look at the photo to make sure everything lines up!) Then glue on the hat pom pom, the nose and his moustache.
- Fill your bauble with sweet treats!

- Carefully cut the belt buckle so that it has two slits down each side. A craft knife is best for this, but please keep it out of the reach of young children!
- Cut your ribbon to 11 inches or so long, that it fits around the bauble.
- Pull the end of the ribbon through the belt buckle.
- Tape the belt onto the bauble.
- Place the bauble into the hole. You may need to cut this hole to size, depending on the size of your bauble.
- Tape a string or ribbon to the back of your Santa if he will dangle from a tree or mantelpiece!
Handprint Santa

Katie over at A Little Pinch of Perfect shared how to make this handprint Santa. Parents and grandparents love gifts like this, as they can look back in years to come and marvel at the tiny handprints! These handprint Santas can also be turned into cards, gift tags – even wrapping paper if you use a big sheet of plain brown paper and make lots of them!
You will need:
- brown or other coloured card (so that Santa’s white beard shows up)
- white paint
- red paint
- (optional but useful) paintbrush
- black and red pens
- scissors
- soapy water or wet wipes at the ready to clean painty hands!
Instructions

- Paint the child’s fingers white to make Santa’s beard. This may tickle! It’s easiest to use a paintbrush for this bit – work quickly so that the paint doesn’t dry before you make the print.
- Paint the heel of the child’s hand, and their thumb, red to make Santa’s hat. Leave the middle of their palm empty.
- Gently press the painty hand onto the brown or coloured card to make the print. You can out your hand on top of the fingers to keep them from wiggling.
- Splish splash in soapy water or wet wipe those fingers to get them clean! Leave the handprint to dry.
- Once it’s completely dry, cut the handprint out. You, or your little one, can draw on eyes and a cherry nose.
- You can glue Santa to a homemade card, tie a ribbon at the top to make a Christmas tree ornament or gift tag, or frame for a loved one.

Which other Santa and fairy crafts and activities have you enjoyed? Send us your pictures and we might share them here for others to make!

 Maybe you’d like to know where the fairy on top of the Christmas tree comes from? or why you never see a Christmas elf? or what exactly happened to Frosty the snowman?


 Fold a small paper doily in half to make the fairy wings. Tape the doily wings onto the back of the fairy.


